Features: Homes for garden animals |  |
Making a nest box for hole nesting birds
There are any number of nest box designs to choose from. Most importantly,  you should select a design which is suitable for the kind of bird you are hoping to attract you should select a design which is suitable for the kind of bird you are hoping to attract you should select a design which is suitable for the kind of bird you are hoping to attract. Robins and blue tits, for example, are attracted to completely different types of boxes: the former preferring an 'open fronted' design and the latter an enclosed box with a narrow entry hole. There are also specific designs for swifts, tawny owls and others. Chris du Feu's book, The BTO Nestox Guide, is a very comprehensive account of the different designs, construction techniques etc for every bird that is likely to nest in or around a garden. There are also a number of good sources on the web, e.g. the homepages of the RSPB and BTO. you should select a design which is suitable for the kind of bird you are hoping to attract. Robins and blue tits, for example, are attracted to completely different types of boxes: the former preferring an 'open fronted' design and the latter an enclosed box with a narrow entry hole. There are also specific designs for swifts, tawny owls and others. Chris du Feu's book, The BTO Nestox Guide, is a very comprehensive account of the different designs, construction techniques etc for every bird that is likely to nest in or around a garden. There are also a number of good sources on the web, e.g. the homepages of the RSPB and BTO.
You can buy nest boxes made from a variety of materials including plastic, 'woodcrete' and, of course, wood. Many of the synthetic boxes are very effective: the design matters far more than the material. However, many people prefer the look of the old fashioned wooden boxes and since this is by far the easiest material to use for a DIY job, that's what we will be using here.
Selecting your materials
Having already decided that we're going to make a box from wood, you might think that there's little else to say here, but there are many different types of wood and some are more suited to this task than others. It is easiest to buy a 'plank' of wood of an appropriate width and thicknessIt is easiest to buy a 'plank' of wood of an appropriate width and thickness: this reduces the amount of cutting you need to do to a minimum. You can work from sheets of wood (e.g. plywood) if cutting is not a problem to you or you need to be more flexible with your dimensions.
It's best to buy untreated timber so that you can be sure that nestlings are not brought into contact with potentially harmful chemicalsI prefer to use 'rough sawn' wood because it gives birds more to grip onto than finished, 'planned all round' (known as 'P.A.R.') timber; both for adults alighting on the box and for well-grown nestlings jostling inside. Rough sawn timber also has the advantage of being cheaper. It's best to buy untreated timber so that you can be sure that nestlings are not brought into contact with potentially harmful chemicals. If you like, you can finish the outside of the box with an animal-friendly preservative.
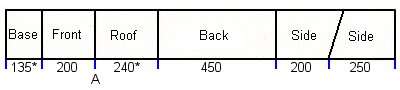
The design we're using here can be made using timber ranging from about 15 by 150mm to about 25 by 175mm. The smaller of these sizes is suitable for tits and the larger is spacious enough for house sparrows (though still suitable for tits). You can make a box for larger hole nesters, e.g. starlings, using the same basic design as that employed here, but you will need to scale dimensions up by quite a bit. The box described here used timber bought as 7 by 1 inch, but in fact its actual dimensions were 20 by 175mm.
Marking out and cutting the wood
It is difficult to give exact dimensions for some of pieces since they depend critically on the width and thickness of your plank; so you must calculate these for yourself. The guidance below will help you to do this.
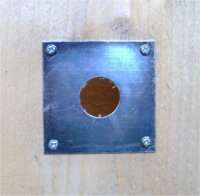 Entrance hole fitted with a 25mm metal hole guard available from the RSPB.
The most difficult cut to make is that for the entrance hole. An electric drill with a specialist hole cutter is best, but you can use a coping saw or a router if you have one. In the past, I've made the hole with nothing more than an electric drill and some sandpaper! The dimension of the hole is important because its size will determine what species of bird will be capable of entering and using the boxThe dimension of the hole is important because its size will determine what species of bird will be capable of entering and using the box. A hole with a diameter of 25mm will allow blue tits and coal tits to use the box, but prevent larger birds like great tits and house sparrows from entering. A diameter of 28mm is large enough for great tits and you must go up to 32mm if you want to allow house sparrows to use the box. It can be hard to cut the hole to such precise dimensions, but you can overcome this problem by using a purpose-made metal hole guard like the one shown in the picture. This also prevents larger birds or mammals from enlarging the hole to get at the nestlings inside the box. Entrance hole fitted with a 25mm metal hole guard available from the RSPB.
The most difficult cut to make is that for the entrance hole. An electric drill with a specialist hole cutter is best, but you can use a coping saw or a router if you have one. In the past, I've made the hole with nothing more than an electric drill and some sandpaper! The dimension of the hole is important because its size will determine what species of bird will be capable of entering and using the boxThe dimension of the hole is important because its size will determine what species of bird will be capable of entering and using the box. A hole with a diameter of 25mm will allow blue tits and coal tits to use the box, but prevent larger birds like great tits and house sparrows from entering. A diameter of 28mm is large enough for great tits and you must go up to 32mm if you want to allow house sparrows to use the box. It can be hard to cut the hole to such precise dimensions, but you can overcome this problem by using a purpose-made metal hole guard like the one shown in the picture. This also prevents larger birds or mammals from enlarging the hole to get at the nestlings inside the box.
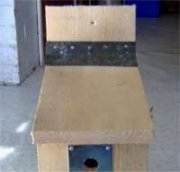
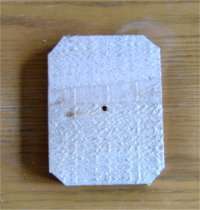 Base with cuts made for drainage. Base with cuts made for drainage.
Don't turn your nose up at sparrows! In my experience they are at least as entertaining as blue tits as garden nesters. The sights and sounds of a male house sparrow proudly advertising 'his' nest box to the local females is truly evocative of British springtime. With upwards of 50% of house sparrows disappearing over the last 25 years, perhaps in part due to a lack of suitable nesting sites, you could really do your bit by providing a nest box for these emblematic garden birds.
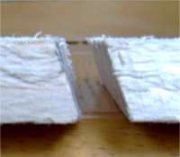
There should be at least one small hole in the base of the box to allow rain water and waste produced by the birds to drain out of the boxThere should be at least one small hole in the base of the box to allow rain water and waste produced by the birds to drain out of the box. I take a small amount of wood off the corners, as well as drilling a hole in the middle of the base, to make absolutely sure that drainage is adequate. This should also improve the ventilation in the box. With a little straw over the base, the birds will not be deterred by the gaps.
Assembling the box
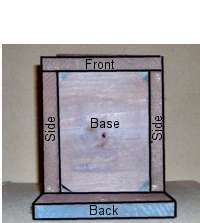
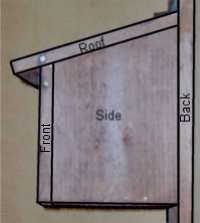
The pictures above show how the various pieces of wood fit to each other to form the nest box. I find it easiest to assemble the pieces in this order: first attach the sides to the front and then attach the base; next this can be offered up to the middle of the back piece with the roof fitted last of all by means of a hinge.
Putting it all together 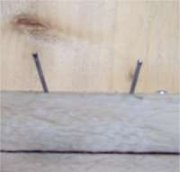 | | 38mm panel pins, angled towards each other, were used to join the wood. |
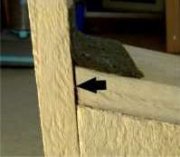
|  | | The hinge was made of some spare shed roofing material. |
| 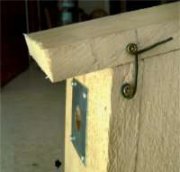 | | The catch for the roof was simply made from two screws and some stiff wire. |
|
I used 38mm 'panel pins' to attach the pieces of wood together. This length was suitable given the 20mm thickness of my wood. Panel pins are quite narrow, so they are less likely to split the wood than thicker nails. Adjacent panel pins should be hammered in at an angle; either towards or away from each other. This makes the join stronger than if they were simply hammered in perpendicular to the wood. A pin every 3 or 4cm should be sufficient to make a robust nest box.
The roof of the box should be attached via a hinge to allow you to open it for cleaning. I used some old shed roofing material, but you can also use rubber from an old bike inner tube, for example. I attached the hinge to the back and roof by using 20mm 'blue tacks' which are easy to knock in, but will hold the hinge material securely. You can buy attractive little hooks to make the catch or, if you prefer, you can simply do as I did and make a catch by putting a screw into the side of the roof and the side of the front piece and join them by means of some stiff wire.
Finishing off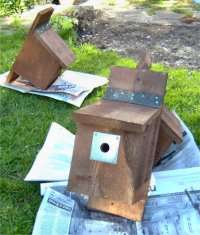 The finished article.You should not use preservatives inside the boxYou should not use preservatives inside the box, since the nestlings will come into very close contact with them and, however animal-friendly they purport to be, this is best avoided. If possible, you should avoid painting them too near to the entrance hole for the same reason. I finished my box off on the outside with animal-friendly preservative. This should make the box last longer and also makes it less conspicuous in the garden. The finished article.You should not use preservatives inside the boxYou should not use preservatives inside the box, since the nestlings will come into very close contact with them and, however animal-friendly they purport to be, this is best avoided. If possible, you should avoid painting them too near to the entrance hole for the same reason. I finished my box off on the outside with animal-friendly preservative. This should make the box last longer and also makes it less conspicuous in the garden.
Hanging the box
Ideally, you should position the box so that it faces away from the prevailing wind and rain and out of direct sunlight. Anything from a north-east through to a southeast-facing wall is very suitableAnything from a north-east through to a southeast-facing wall is very suitable. Nest boxes for garden hole-nesting birds do not have to be placed on a tree or amongst vegetation: you can get equally good results by putting the box on the wall of your house or outbuilding. Around six foot should be considered as a minimum height above the ground for the box; but wherever it goes, it should be out of the reach of cats, which, even if they can't get into the box, can still worry the parent birds and cause the failure of the nest.
You should hang your box as soon as possible since birds may take some time to get used to it; particularly residents like house sparrows. You might have to wait several years before your box is used for nesting; but take heart - it will almost certainly be used in winter as a valuable roosting site during very cold weatherit will almost certainly be used in winter as a valuable roosting site during very cold weather. When I cleaned one of mine out in spring, I found a couple of hibernating hoverflies in it, so even though I've not had nesting birds in that one yet, I can at least see that its being used by the garden wildlife in other ways.
Aftercare
Around September or October you should inspect the box and remove any nesting material or other debris which you find there. You can then add some clean straw (don't pack it too tight) to make the box attractive as a winter roosting box for small birds. Up to 60 wrens have been seen leaving a single nest box after very cold winter nights! In the spring, around early March, clear the box out again ready for the nesting season, perhaps just leaving a little straw in the bottom of the box.
| First published May 2003. Last revised February 2004. | |
Copyright Richard Burkmar 2003. Permission is hereby granted for anyone to use this article for non-commercial purposes which are of benefit to the natural environment as long the original author is credited. School pupils, students, teachers and educators are invited to use the article freely. Use for commercial purposes is prohibited unless permission is obtained from the copyright holder. |
Back to home page
Do you live in Merseyside? Interested in its wildlife? |